Whoa… There’s a snowman on my head!

I like experimenting with new ideas, so in the spirit of the snow-filled season ahead, I decided to have some fun making this wacky hat.

Not much yarn was needed—just a half-skein of white Bernat Softee Chunky (150m/164 yds/100g/3.5oz.) yarn, along with a bit of scrap yarn in orange (for the carrot), red (for the scarf), and black (for the hat). I used a 7 mm hook for the snowman, and a 4 mm for the carrot, scarf, and hat.

You can use any beanie-style hat pattern that you have on hand to make a plain white hat—mine was made very simply with enough rounds of half double crochet to fit my head. For the last few rows, I switched to some white Homespun yarn to add a textured border. Once the hat is finished, you’ve made the snowman’s ‘body.’

For the snowman’s head, I used the same chunky yarn to crochet a ball the size of a large pom pom, stuffed it with fibrefill, and stitched it to the top of the hat.

Next, I crocheted a tiny carrot with some scrap orange yarn and sewed it mid center on the snowman’s face. Then I sewed on two black buttons for the eyes. I sewed three larger black buttons down the front of the hat to mimic ‘buttons on a snowman’s body.’ 

Next, I crocheted two rows of red Homespun-style yarn to make the scarf, and tacked it down around the neck with a few stitches.

Then, I used the black yarn to crochet a top hat in 2 pieces. First, I did a few rounds to make a circle for the ‘brim.’ Then I crocheted the top part of the hat in rounds (same process as if I were crocheting a tiny basket). Next I centered the top part of the hat atop the circle, then sewed the pieces together. Last, I sewed the hat to the top of the head.

It was a fun project to work on because I had no idea how it would turn out, but I have to say I’m pleased with the results. 

I think I may need to be dared to wear it out in public, though! LOL

Soft Green Spider Web Scarf/Shawl

This delicate scarf/shawl is made with a plush yarn that makes it surprisingly warm and there is a lot of length for wrapping around your shoulders on a cool summer evening.

Materials:

I lost the label for the yarn, but it’s a bulky plush. I’ve provided a photo so you can match it as closely as possible. I used a large ball (approx. 300 yds)

6.5 mm hook

Yarn needle for weaving in ends

Large pearl-look dollar-store beads

Beading needle and thread

PATTERN:

Chain 176.

Row 1: dc in 5th ch from hook (counts as dc, ch 2), 6 dc in same st, ch 2, sk 2 ch, dc in next ch, ch 10, sk 10 ch, dc in next ch, ch 2, sk 2 ch, *7 dc in next ch, ch 2, sk 2 ch, dc in next ch, ch 10, sk 10 ch, dc in next ch, ch 2, sk 2 ch; rep from* across, ending with 7 dc in next ch, ch 2, sk 2 ch, dc in 3rd ch of beg ch-5, turn.

Row 2: Ch 5, *7 dc in top of 4th dc of next 7-dc group, ch 2, sk 2 ch, dc in next dc, ch 10, sk 10 ch, dc in next dc, ch 2, sk 2 dc, rep from* across, ending with 7 dc in next ch, ch 2, sk 2 ch, dc in 3rd ch of beg ch-5, turn.

Repeat Row 2 until shawl is your desired depth. Mine measured a length of 80” x 15-1/2” deep.

Once finished, I neatened up both 15-1/2” ends with one row of sc.

TASSEL & PEARL FRINGE:

Next, I made tassels with pearl bead ends to attach to the last 7-dc group of the row, as shown in picture.

To make each tassel, I cut three 24” pieces of yarn; folded them in half; cut another piece of yarn about 10” long which I used to tied them together in the center of the fold with a knot; then kept winding that remaining piece of yarn into a knot until it because a round ball of a knot at the top of the fold where I made the first knot. Then I threaded the beading needle, stuck the needle in the bottom of the big round knot and brought the thread up through the top of the big knot, added a pearl bead so it sat on top of the big knot, then brought the needle up into the bottom of the last 7-dc group and stitched back and forth a few times to make sure the pearl and tassel were fixed securely in place. Then I knotted the thread and fastened off. I repeated this process along the bottom of the scarf/shawl, attaching pearls/tassels to the last 7-dc group of each row. I hope this makes sense. Refer to the photo (and my rough drawing below!) for visual description.

Use any 6″ square pattern to make a pretty granny square purse

PLEASE NOTE: Since this post has run, I’ve had a lot of requests for 1-bag_purse-granny-brownthe exact pattern I used to make this purse. It’s called Lavender Square and you can find it at the Hooks and Yarns blog, at this link: https://www.allfreecrochetafghanpatterns.com/Granny-Square-Patterns/Lovely-Lavender-Square. I’ve added the types of yarn I used in the instructions below. I did the first 4 rounds of the square in variegated and the remaining rounds, plus the border in the solid color.

This 18″ wide x 10″ deep purse is roomy enough to carry everything but the kitchen sink.

Use any crochet square pattern you like (there are zillions to choose from on the Web), use your favorite yarn colors, and put them together using my template samples shown below, which require 10 squares.

For the purse shown, I used a 6 mm crochet hook and my squares were approx. six inches. I used a variegated color for the first few rounds of the square (Impeccable Earth) and a dark taupe (Red Heart Super Saver Café Latte) for the last couple of rounds. You can make your purse larger or smaller, depending on the size of square you choose to use.

How to make your purse:

Choose the square pattern and yarn that you’d like to use. (I used the Lavender Square from Hooks and Yarns at http://hooksandyarns.blogspot.ca/2013/02/simply-pretty.html. For the variegated yarn, I used Impeccable Loops & Threads in Earth, and for the solid color, I used Red Heart Super Saver in Cafe Latte. (This link at Crochet Pattern Central offers tons of 6″ crocheted square patterns to choose from! https://www.crochetpatterncentral.com/directory/6in_squares.php )

Make 10 squares.
(1) Using your edging color (mine was the taupe), seam your squares together in three separate pieces (with one extra single square, set aside) as shown below, attaching them (right sides together) using single crochet. The x’s in the picture here show where the squares have been seamed. So you should end up with one row of two squares, one row of three squares, one row of four squares, and one single square.
2-seam-squares
(2) Next, you need to seam your rows together exactly as shown below, with the row of two attached to the row of three, the row of three attached to the row of four, and the single square attached to the right side of the row of four. The x’s shown represent where you’ve seamed, using single crochet again.3-seam-rows
(3) Once your squares are all seamed to form one piece, you can line your purse with fabric if you want. As you’ll see in the photo below, my impatience makes me sloppy with sewing my lining, so you might want to slow down and use tidier stitches! Anyway, I just cut a piece of fabric in the same shape as my one piece of seamed squares and hand-sewed it with needle and thread to the wrong side, making sure that the last row of crochet around the entire piece is uncovered so you’ll be able to seam the edges together when you fold it.4-lining
(4) Once the lining has been sewed in place, fold exactly where the dotted lines are shown below, placing right sides together and lining up edges, then seam edges together with single crochet. The longest dotted line is the bottom of the purse and the two shorter dotted lines are the sides of the purse. To make things neat, I crocheted a border around the mouth of the purse using two rows of single crochet.
5-fold
(5) Next, using the taupe yarn, I crocheted 4 simple rectangles for the handle rings, 3″ wide (6 dc + turning wide) x 5.5″ long, and I used a yarn needle to sew one to the wrong side of each of the four points where the handles will be attached.
6-front-back-handles
(6) The rings are actually wood curtain rings that I picked up at Fabricland (removing the little hook screwed into each one). Wrap the loose end of each of your rectangle tabs around each wood ring, and sew it securely again to the wrong side with your yarn needle.
7-handle-ring
(7) For the two straps, I used the taupe yarn, crocheting each one approx. 1.5″ wide x 32″ long (6 dc + turning across). Then I wrapped the very ends over the rings and used my yarn needle to stitch them on securely (sewing on wrong sides). As shown below, one strap is positioned on one side of the purse, the other strap on the other side.
8-handles9-all-handles
(8) Next, I made a fastening tab with a buttonhole space for closing the purse. I crocheted it 3″ wide x 5.5″ long (10 dc + turning wide) minus edging. Once finished, I used my yarn needle to stitch it to the center of the back side of the purse, then I used my variegated yarn to single-crochet a border around the edges.
10-buttonhole-flap
(9) Last, I sewed a wooden button to the middle front of the purse, about an inch down from the edge.11-button-placement

I’m fairly new at making up my own patterns, and still getting used to writing tutorials, so I’m sorry if I’m unclear at any point. I get so enthusiastic when I start a project, I just dive into it, and then I find myself thinking halfway through that I really should have been making step-by-step notes. Hopefully, I’ll get better at this as time goes on!12-bag_purse-granny-brown2

Keep warm with these two Crocheted Hoodie Scarf patterns

1When you live in a climate that requires dressing to stay warm from November to March, a hoodie scarf becomes one of your most treasured pieces of outdoor clothing!

A hoodie scarf is easy enough for a beginner to work on, as it’s basically just a long, wide scarf folded in half and seamed down from the fold on one side to create a hood. It’s both a hat and scarf in one handy piece.

Since a hoodie scarf is simply a big rectangle, you can experiment by using any of your favorite stitch designs, as long as you make your initial chain wide enough to create a proper hood. It’s a really fun project to work on—you can mix colors and patterns, combine different types of chunky yarn, and it doesn’t take long to complete!

2I’ve supplied very basic instructions so you can experiment with two different types of hoodie scarf.

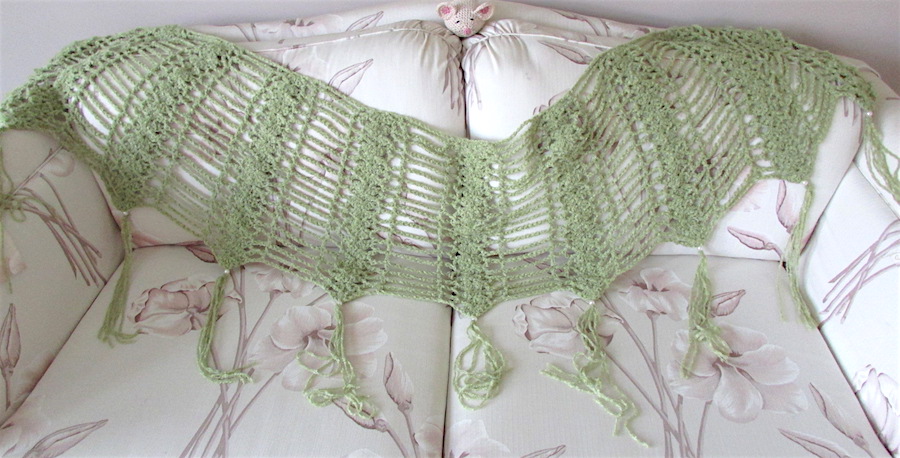
As a basic guideline, my hoodie scarves are approximately 50″ long x 10.5″ wide.

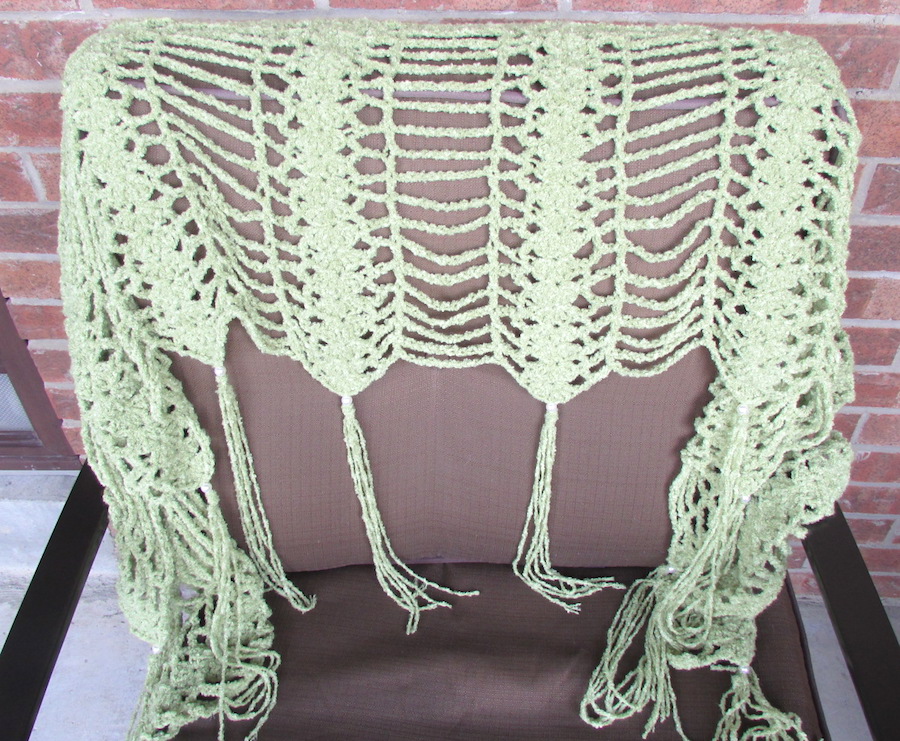
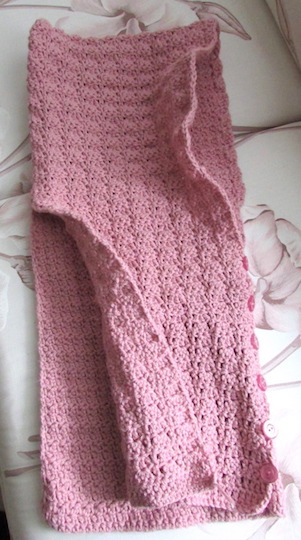
For the Two-Textured Rose pattern, each 25″ side is crocheted in a different stitch design.

The scarf was crocheted in one piece and then folded in half, with the fold made where the two different stitch designs meet each other.

Two-Textured Rose Hoodie Scarf 

Materials:

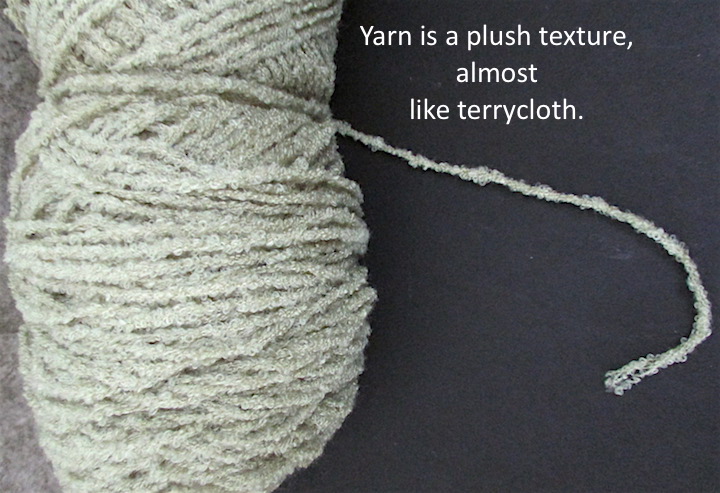
  • One ball of Phentex Worsted yarn, Light Old Rose (14 oz/400g/ 867 yds/792m)
  • 5 mm crochet hook
  • Six ¾” rose-colored buttons
  • Sewing needle and pink thread for sewing on buttons

3First side (Texture 1): Ch 43

Row 1: Sc in 2nd ch from hook and in each ch across.

Row 2: ch 2, skip 1st st, *(sc, dc) in next st, sk next st,
rep from* across, sc in last st, turn.

Repeat Row 2 until piece is approx. 25 inches long. Don’t fasten off.

Second side (Texture 2):
Continue crocheting, but working in a different pattern.

Row 1: Ch 1, sc in each st across, turn.4

Row 2: Ch 3, sk 1 st, *3 dc in next st, sk 1 st, 1 dc in next st, sk 1 st,
rep from* across to last 3 sts, 3 dc in next st, sk next st, dc in last st, turn.

Repeat Row 2 until this second half is the same length as the first half, or approx. 25 inches long.

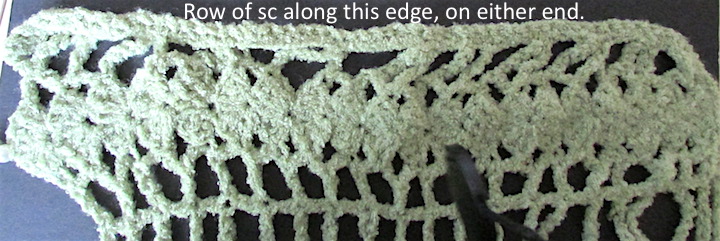
Finish final edge with a row of sc in each stitch/space across. Fasten off and weave in yarn end.

Lay scarf out flat with right side facing you, and then fold scarf in half, placing right sides together (where Texture 1 ends and Texture 2 begins) so that you’re now working with the wrong sides.

5To seam back of hood: At left side, starting from fold, measure 10.5″ down; place a marker through both scarf edges. Using crochet hook and same color yarn, use slip stitch to seam sides together from fold to marker. Fasten off and weave in yarn end.

To make front hood edging: Turn hood/scarf inside out to the right side, which is where you’ll be working now. The edges opposite to the hood seam will be the front edges of the hood. On the left side of the front hood edge, place a marker 10.5″ down from the fold (same distance down where your hood seam ends), then measure the same distance down on the right side and place a marker there.6

In the marked space on the left side, connect your yarn with a slip stitch; dc in the next space and in each space around until you reach the marked space on the right side. Slip stitch into that marked space, and then fasten off and weave in yarn end. Because there are different stitch patterns on either side of the hood, just try to dc as uniformly as you can in the spaces you have to work with.

You can also do a shell edging instead of the plain dc—simply start with your slip stitch, then *dc in the next space, skip a space, 3 dc in the next space, skip a space, and repeat from * around, ending with a dc and then a slip stitch in the last marked space.

Front buttons: (working on the right side) Placing a marker about 3.5″ down from the front edging on the right side of the scarf, I sewed six ¾” buttons, evenly spaced apart, from the marked space to the bottom of the scarf. The texturing of the left side scarf edge allowed for natural “buttonholes” that fit neatly over the buttons so that the scarf can be securely buttoned from under your chin to down over your chest, and will lie nice and flat under a buttoned-up coat.

chunky-hoodie2Warm & Fuzzy Infinity Hoodie Scarf

This was actually just an experiment in using two completely different types of yarn together (both chunky) and it turned out with wonderful results! You can try using the same pattern with two types of any chunky yarn.

This is how I did it:

Materials: One ball of super bulky Red Heart Light & Lofty yarn in Beachy Keen (4.5 oz/127g/105 yds/96m); One ball of Bernat Roving yarn in Taupe (100g /3.5 oz/109m/120 yds)chunky-hoodie1

6.5 mm crochet hook

Finished width: 10.5″ / Finished length: approx. 62″

Use any stitch pattern you like to achieve the above dimensions.

I used the Roving yarn until the ball ran out (with just enough left for sewing the hood seam), which created a piece that approx. measured 40″, then I continued with the Red Heart Light & Lofty and continued in the same stitch pattern until that ball ran out (with just enough left to seam together the scarf ends to make it into an infinity), which gave me another 22″.

chunky-hoodie3I used this simple v-stitch pattern for the entire scarf:

#1. Chain until you have a 10.5″ width + 2 extra chains.

#2. Turn, sc in second chain and in each across. Turn.

#3. Ch 3, skip 2 spaces, *single v-stitch (1 dc, ch 1, 1 dc) in next space, sk 2 spaces, double v-stitch (2 dc, ch 1, 2 dc) in next space, skip 2 spaces, repeat from * across and end row with: single v-stitch, skip 2 spaces, dc in last space, turn.

chunky-hoodie4Repeat #3 for entire until first ball of yarn runs out, attach second yarn ball, and continue with the same pattern until it runs out.

You’re going to make sure that the hood is made from the longer (40″/Roving) portion of the scarf. To do this, fold your scarf (right sides together) so that the row where you fastened the second type of yarn is 10″ below the fold. Using the leftover piece of Roving yarn, seam both edges of one side together to form the hood.

Then, using the piece of leftover Red Heart yarn, seam together the two scarf ends so that it becomes an infinity.

chunky-hoodie6I never bothered with any edging because with the yarn being so chunky, it doesn’t seem to need any, but feel free to add some single-crochet edging around if you so desire.

Now, try on your new hoodie scarf. You can wear the infinity part loose, or twist and wrap it around your neck to the back of the hood, which will keep your neck extra warm. Enjoy!chunky-hoodie7

chunky-hoodie5

Calling all beginning crocheters: Make your first throw with this easy pattern!

afghan_vanilla-throw1This pretty crocheted throw with soft, fluffy border is wonderful to throw around your shoulders while relaxing on the couch. It would also make a lovely baby blanket gift. This is an easy pattern that allows beginners to practice working with v-stitches, as well as combining a chunky yarn with worsted weight. 

VANILLA VEE THROW

Materials:

  • Lion Brand’s Pound of Love yarn in Antique White (A);
    one ball of Loops & Threads Country Loom yarn in Warm Cream (B)
  • 9 mm hook

V-stitch (v-st): (dc, ch 1, dc) in same space

How to HDC (half double crochet): http://www.redheart.com/learn/articles/how-half-double-crochet

How to DC (double crochet): http://www.redheart.com/learn/articles/how-double-crochet

How to attach a different colour of yarn: http://www.redheart.com/learn/articles/how-join-new-yarn-crochet

afghan_vanilla-throw2Throw Pattern:

Starting with yarn (A), ch 101.

Row 1: dc in 5th ch from hook, ch 1, dc again in same ch (beginning v-st made); *sk next 2 ch; (dc, ch 1, dc) in next ch; repeat from * across to last 2 ch; sk next ch; dc in last ch. Turn.

Row 2: Ch 3 (counts as dc); (dc, ch 1, dc) in ch-1 space of each v-st across; dc in top of turning chain.

Row 3-58: Repeat Row 2. Fasten off.

Row 59: Attach yarn (B); create a border around entire piece with 1 hdc in each sp around and 3 hdc in each of the four corners. Fasten off.

Row 60: Attach yarn (A), dc in each hdc around, with 3 dc in each of the four corners; turn.

Row 61-63: Repeat Row 60. Fasten off.

Row 64-67: Attach yarn (B), hdc in each dc around, with 3 hdc in each of the four corners; turn.

Row 68: To finish off, sc in each hdc around. Fasten off and weave in ends.

(To make this throw larger, just add more rows to each (A) and (B) section.)

Beginners can check out the Red Heart site for everything you want to know about How To Crochet: http://www.redheart.com/learn-to-crochet


I can’t believe how easy this was to make!

top & skirt1I made this two-piece dress by crocheting the top first and then making a long, fabric skirt with an elastic waist to pair it with. I made this project up as I went along, but I swear to you, it was so easy that a beginner in both sewing and crocheting will find it a breeze. Because of my impatient nature, I am very clumsy with a sewing machine, so if I can produce these results, a chimpanzee could probaby do just as well!

As usual, I got so caught up in my project, I forgot to take photos of each step as I went along, so I did step-by-step drawings on paper. Hopefully, they’re clear enough to understand. As I describe the process, keep in mind that I’ve measured everything to my own size, which is medium. Take your measurements ahead, and make sure you try on the pieces as you go along to make sure you are custom fitting to your own measurements.

topAs is the case with many of my projects, I hadn’t intended on making a dress. It just sort of happened as things evolved. I began with the intention of crocheting a simple tank top. I decided to start with a plain, bandeau-style piece that I would later add two shoulder straps to. Really, a bandeau top is nothing more than a wide rectangle (along the same lines as a scarf).

Using a 6 mm hook and navy blue worsted weight yarn, I chained a row that measured approximately 10 inches. Then I chose a very simple stitch pattern that would produce a tight enough stitch to negate the need to wear a camisole underneath. As I said earlier, the finished top is a medium size. To make it smaller or larger, just measure around your chest and adjust the sizing so that it’s smaller or larger than 10 inches. Here is the stitch pattern I used to make a medium-sized top:

Chain (ch) an even number of stitches to make a 10-inch-long row, plus ch 2. Turn.

Row 1: (1 sc, ch 1, 1 sc) into 3rd chain from hook. *Skip next ch, (1 sc, ch 1, 1 sc) into next chain, repeat from * to the last chain; 1 sc into the last ch; ch 2 and turn.

Row 2: *(1 sc, ch 1, 1 sc) into ch-1 space, repeat from * to the end; 1 sc into last sc, ch 2 and turn.

Repeat Row 2 until desired length.

1I repeated rows until the bandeau was long enough to wrap around my chest with both ends meeting. Then I used a yarn needle to seam both ends together so that the piece became a tube top shape.

2Next, I carefully measured and used stitch markers to mark where I wanted the two straps to be. I wanted wide straps, so I made each one a 3 inch width, using the same stitch pattern as above.

Once the top was completed, I single-crocheted around all the top 3edges, including the straps, just to give the entire thing an evenly finished look. I chose a scalloped edge for the bottom (any 5 sc shell pattern will work), and it was done.

For the skirt, I measured the widest part of my hips, and bought a square of silky fabric that would wrap around my hips, also allowing for a quarter-inch seam. At the top (which is the waist), I 4folded over a “hem” a little wider than the elastic that I’d be using for the waist. (Keep in mind that all sewing is done on the wrong side.) Then I just straight stitched the hemmed section across on my machine. What you end up with looks just like the sort of “pocket” you would have at the top of a curtain, with both ends open where the rod slides in.

5Next, I pinned the back seam of the skirt together and sewed it with a ¼ inch seam from just below the waist openings where the elastic will run through, right down to the bottom of the skirt. The hem will be the last thing you focus on.

Cut your piece of elastic just a smidge smaller than your waist. Hook a safety pin onto one end of your elastic, and use the safety pin to push it along through the waist 6“pocket.” The skirt waist will gather as you run the elastic through, and that’s how it should work.

7Once you have both ends of the elastic poking out of either end of the pocket, sew the elastic ends together. Once secure, you can sew together the rest of the back seam of your skirt.8

All you have left is to trim the bottom of the skirt to whatever length you desire (I elastic waistwanted a long, ankle-length skirt) and then hem it.

When you put the top and skirt on together, the top edging will cover the elastic waist of the skirt and it appears as if it’s one piece.skirt with elastic waist

The skirt took me all of 20 minutes to make, from start to finish. I made the crocheted top within a week of on/off crocheting at night in front of the TV. Easy peasy.

I can’t wait to make another one!top & skirt2

The beach is never far away when you have the Beach in a Bottle

Coastal-Living_DecJan-2012-CoverAs you will already know if you’ve read some of my past posts, I LOVE THE SEA. My lottery-win fantasies revolve around one central vision of my family living in any one of those gorgeous beach houses featured in my favourite magazine, Coastal Living. I can see myself gazing out at the sea every day through floor-to-ceiling glass walls or going for long walks in sand that’s damp from lapping waves.

Living in Toronto, the only time I’m around salt water is when a pot is boiling on the stove.

The other day, while daydreaming about past beach vacations (instead of writing the advertising copy that I was supposed to be writing) I had a great idea for a beachy craft.

I had recently bought a pack of those tiny corked bottles from the craft section of the IMG_6376dollar store, with a plan to fill each one with the beach sand that I’d collected each time we’d visited a different area over the years. Once the bottles were filled, I would use fancy script to label each one. So far, I’ve collected sand from Aruba, Curacao, St. Thomas, St. Martin, different parts of Mexico and Florida. I hope to visit many more places in the years to come (especially the Hawaiian islands!!), and what better way to keep a little piece of each place close by.

My beachy craft idea goes a step further, incorporating some tiny shells and a flip flop charm to turn it into a miniature beach scene. I attached the eye pin and chain to make it into a memento necklace, but I think I’d rather just keep my little bottled beach vignette on my desk to keep the beach within sight all year round.

If you would like to make one, here’s how:
beach in a bottle2

Beach in a Bottle

✓ One tiny buck store corked bottlebeach in a bottle3
✓ A couple teaspoons of collected beach sand
✓ Some tiny shells
✓ A small flip flop charm
✓ One small eye pin and a chain (optional)

Fill the bottle halfway with sand, use tweezers to drop the flip flop charm into place, then place your shells in the sand and just use a long needle to nudge them into however you’d like them to be positioned.

Voila! The beach in a bottle.

Make yourself a delicious ice-cream sundae with ZERO calories!

pincushion_icecream sundae vanilla copyToo good to be true? Not if it’s made of fabric. 🙂

Whether or not you have a sweet tooth, you’ll find that these sundaes are highly addictive!

They make great pincushions or pretend food for kids to play with.

You can make one in less than an hour. Here’s how:

Materialspincushion_icecream sundae chocolate copy

✔ a cupcake-size dish purchased at the local dollar store

✔ a 7” x 7” square of white (or other colour) fabric for the ice cream

✔ a 3” x 3” piece of brown felt for the chocolate sauce

✔ a small piece of white felt for the whipped cream

✔ a small piece of red felt for the cherry

✔ some seed beads for the “sprinkles” on the chocolate sauce

✔ some fiberfill stuffing

✔ matching thread; sewing needle; scissors

1. Starting with the ice-cream fabric square, trim the square into a circle as close to the size of the square as you can trim it. (See my step-by-step strawberry ice cream photos below.)

2. Thread a needle, knot the end, and run a straight basting stitch around the circle, about a ¼” from the edge. Pull the thread a bit so that the edges of the circle begin to gather, then stuff it with fiberfill while pulling the thread to close up the circle. Secure the closure and knot the thread. Now you have your ice-cream ball.

3. Next, take your brown felt (I just used a brown patterned fabric in my photo sample below, but felt is the easiest material to work with and turns out the best results) and cut out a curvy shape. Then use small straight stitches to sew it onto the top of your ice-cream ball.

4. Next, take your white felt, cut a small circle, then cut it into a bit of a spiral. Set it on top of the sauce, nudge it into a whipped cream shape and gently sew it down so that it doesn’t completely flatten out and there’s still some volume to it.

5. For the cherry, cut a small circle and stitch around it exactly as you did with the ice cream. Fill it with a tiny bit of fiberfill, close and secure it into a ball shape. Then nestle it in the center of the whipped cream and stitch it down.

If you want to decorate the sauce with seed bead sprinkles, just sew them on randomly.

Now, make as many flavours as you like and I guarantee that you won’t gain an ounce! 🙂

Step-by-step photos:
Screen Shot 2015-06-10 at 9.54.01 AM

Screen Shot 2015-06-10 at 9.54.07 AM

Screen Shot 2015-06-10 at 9.54.13 AM

Every life has a story. What’s yours?

An acquaintance of mine recently lost her mother. Her father had passed away ten years before. None of her parents’ friends were still living, nor were any elder relatives on either side of the family. When she lost her mother, she also lost her last chance to document the stories from her family’s past that hadn’t yet been told. She used to feel that she had all the time in the world. Now she regrets that she didn’t make more of an effort to interview her parents and relatives so she could have her parents’ memories on record for future generations to enjoy.

journal writingTake a look at today’s hottest-selling books and you’ll realize that a large number of them are memoirs. No wonder—we human beings are fascinated with lives lived by other human beings. We’ve become a reality-obsessed society with an insatiable appetite for connection through learning about the tribulations and triumphs of others: sad times, happy times, crazy times. We are particularly intrigued if we can relate any of it to our own personal life experiences.

We each live a life as unique as our fingerprints. You may believe that you’ve led a relatively uneventful life but if you take a look back at the many things you’ve experienced, it’s a sure bet that a certain percentage of the population would find some if it interesting and perhaps even meaningful. You have acres of memories warehoused inside your brain that your children—and their children—would someday enjoy reading about.

We all have stories. It’s time to tell yours.

Think about all the years that have passed since the day you were born. A lot has happened since you entered this world. Your years are a kaleidoscope of experiences, more than you are even capable of remembering. Think about all the people you’ve known, the places you’ve been, the lessons you’ve learned, the times you’ve laughed or cried or been scared, the hopes and the dreams you’ve had, the goals you’ve achieved. Your life is made up of all this and so much more; the life you’ve lived so far deserves a page of its own in your family’s history.

You don’t have to be a professional writer to create a journal of your life. If you can type at a keyboard or write longhand on paper, you are capable of documenting short stories about your life that you can eventually share with your loved ones, or simply document them for your own personal enjoyment.

You are unique; there is not another person on earth quite like you. No other human being shares the same story as yours. Even identical twins don’t share identical stories. Memories fade and that’s why it’s so important to preserve your life stories for generations to follow.

How do I begin?

My own preference is to keep a journal because writing in longhand gives me a feeling of going back in time, when we wrote our school assignments in blue-lined notebooks. Pick up an inexpensive hardcover journal at any discount store (hardcover, because it feels more like a real book) and tuck it away in a handy place. Choose the same time every week—or every day if time allows—to devote your attention to recording memories from your past. You can set a specific length of time that you’ll write, or you can simply write until you feel like stopping. Whether you write a couple of sentences, a paragraph, or several pages, turning it into a habit is key.

If you’re more comfortable writing at a keyboard, set up a journal file on your computer and add to it regularly. Again, training yourself to write on a regular basis is essential to turning it into routine behaviour.

Where do I begin?

There are several ways to kick-start the process.

There is no rule that says you have to write in any particular order. You can start with your earliest memories, or you can start writing about something that happened yesterday. As you get into the groove of journaling regularly, you’ll find that new memories will pop into your mind without much prompting.

If you need a push, try flipping through old photo albums. Think back about the events that took place in your life when specific pictures were taken. What emotions were you feeling at that time? Let your memories guide your story.

Think about a particular year and try to remember events that took place during that year. Or think back about single important world events and where you were at that time in your life. Ask just about anybody what they were doing when 9/11 happened and they’ll remember right away.

While you write, try to use descriptive words that will help the reader visualize the scene you’re describing. For example, you’re writing about a family picnic at the beach. Along with the events that took place, are there certain smells that you remember? Sounds? Emotions? A bit of dialogue will also add interest to your story. Did your dad say something funny that day? Did your mom issue one of her famous “warnings” to one of your siblings?

And don’t waste time worrying about your spelling and grammar skills; you can go back and fix up the mechanics of your story once you’ve got it all down. Aim to write in the same voice that you would use if you were talking to an old friend.

Ready to start writing your memoir?

Here are some prompts to get you started.

  1. When and where were you born?
  2. Why did your parents choose your name?
  3. Have your parents told you any stories about yourself as a child?
  4. What is your favourite family recipe?
  5. Did you have a childhood pet? If so, what was it and what did you call it?
  6. What was your favourite childhood toy? Why?
  7. Did you have a childhood hero?
  8. What school subject did you dislike? Like?
  9. Did/does your family have any special traditions?
  10. Is there a lesson that stands out most clearly when you reflect on a particular incident from your childhood?
  11. Is there a world event that had an impact on you while you were growing up?
  12. What fads do you remember from your youth?
  13. What did you want to be when you grew up?
  14. What was your very first job? How much were you paid?
  15. When did you realize that you were a grown up?
  16. You most memorable vacation?
  17. This song immediately takes you back in time…
  18. Talk about your hobby.
  19. How is the world different today from how you saw it as a child?
  20. Of all the lessons you learned from your parents, which was the most valuable?
  21. If you could do one thing differently in your life, what would it be?
  22. What are you most grateful for?
  23. What is your greatest accomplishment so far?
  24. What would you like to be remembered for?
  25. Have you wished for something that came true?

Happy journaling!

My latest mixed media fabric portrait

maMy mom celebrated her 80th birthday last week (that’s her to the left with champagne all over her dress. Not bad for 80, huh?). I wanted to make her a fabric portrait like the one I made for my dad when he turned 80 (you can take a look at it back in my September 26th post).

So I selected one of my favourite photos of her to use as my templeileen@niagara2ate—a black & white that was taken in Niagara Falls when she was in her 20s.

Little did I know at the time how ambitious a choice that photo was, since it was a full-body shot instead of an uncomplicated head shot like my dad’s.

To my detriment, I can get over-enthusiastic when I have an idea for a project and tend to leap feet first into it without any advance planning. Therefore, stumbling blocks that I hadn’t planned for often crop up as the project evolves. I’m nuts; yes I know. It’s truly amazing that things end up working out in the end as often as they do.

Since that’s how I roll, I also find myself living by the motto “You win some; you lose some.” It’s what I say whenever I start a project with good intentions only to end up relegating it to the “maybe someday, I’ll rip this apart and start over again” pile.

That’s exactly how I began to feel with this project after I was elbow deep into it. More than once I was on the brink of just tossing the whole thing in the trash and heading out to the mall instead to buy my mother a gift that wasn’t spattered with my blood, sweat and tears.

IMG_3637I started the project on a Saturday morning, using Photoshop to pixelate the shot, then printed out an approximate 15” x 15” copy. I used a pen to outline all the various shadow layers on the hair, face/neck, arms and legs and shoes, then traced each layer onto tissue paper to create my patterns.IMG_3636

Next, I selected different tones of grey fabric for the skin and a plain plus a patterned black for the hair. For the top, I chose a crepey white cotton fabric and a white and grey patterned fabric to add a touch of shadowing. The shoes were created with three different shades of cream fabric. I wanted the skirt to be the only three-dimensional part of the portrait so I chose a silky black and white fabric that I could arrange to look poufy, just like in the picture. For the background, I used a large square of plain white cotton fabric.

After cutting out all the fabric pieces, it was time to put the puzzle together. Some of the face pieces were so tiny, I had to use tweezers to pick them up and manipulate them into place. Starting with the legs, I arranged the layers together, then temporarily affixed them with a combination of temporary fabric spray glue and hand-basting. Once I finished the legs and shoes, I moved on to the arms. I left the face/head for last, which was a good call because I would have thrown in the towel if I’d started there. Once those pieces were finally in place (guided by outbursts of cursing), I began laying out the basted parts on my white fabric background. Pinning down the blouse and skirt was the best part, the easiest part. I actually gathered the waistline of the skirt with basting so it would fit the picture realistically.

Once everything was pinned into place on the background, I wanted to cry because as far as I was concerned, my mom’s face looked like that of a mummy you’d dig up from the tombs in Egypt. I was, again, this close to trashing it. But I plugged on and I’m glad I did because—just as a cupcake needs icing—it’s the finishing details that really bring the picture into focus.

First I hand-stitched everything into place, pulling out the basting as I went along. Then I used light grey thread and the finest zigzag stitch on my sewing machine (I also have a quilting foot on my machine to handle any bulky areas) to outline most of the pieces. After all the sewing was complete, it finally resembled the original photo. Whew. Last but not least, I sewed into place a button replica of her earring.

As I stood back to appraise my work, it was obvious that I still had more to do, since my fabric mom looked like she was just floating in a big white space, her arm jutting out into nowhere. I’d been hoping to avoid having to add in all the background details but the picture looked incomplete without them. Damn.

I was done with cutting out any more tiny fabric pieces. No way. Not a chance. So how to get some background detail in there?

Sketching pencils and paint to the rescue! It wasn’t a piece that would ever see the inside of a washing machine, so there would be no problem using regular art materials on the fabric.IMG_3590

I used a pencil to draw the outline of the stone wall and the iron railings behind her. Then I used a combination of pencils, charcoal pencil, and acrylic paint to add shadows and texture. Before long, her hand was actually holding a railing instead of dead space.

As my best friend Sue (a quilt-a-holic who produces the most stunning work) often says, “Don’t things just always seem to fall into place when we really need them to? It’s as if an invisible hand reaches out to help us when we’re stuck.” And that’s exactly what happened after I finished my fabric picture and began to wonder what I was going to use to frame it.

I recalled a large picture frame that my daughter had left behind when she moved out of the house years before; she’d left it leaning against the wall behind her closet door. It was a beautiful, solid frame, but I’d never had any use for it—until now. I dragged it out of her closet and didn’t it just happen to be the exact size and colour (black) of frame I needed. Honestly, my fabric portrait fit the frame as if they’d been made for each other!

In the end, all that work was worth every moment. My mom absolutely loves it.

IMG_3592